Yeast, Mold, or Something Else? A Complete Guide to Identifying Kombucha Contaminants
Brewing kombucha is like creating your very own little ecosystem. You’ve got a symphony of bacteria, yeast, and the occasional unexpected guest…
Brewing kombucha is like creating your very own little ecosystem. You’ve got a symphony of bacteria, yeast, and the occasional unexpected guest all working together to transform sweet tea into that tangy, effervescent brew we all love. But let’s be honest—sometimes, that symphony hits a sour note. You open the lid of your brew jar, and instead of a serene SCOBY floating on top, you’re greeted with something that looks like it belongs in a science experiment gone wrong. Panic sets in. Is it yeast? Mold? Fruit flies? Or some kombucha creature from the deep?
Before you start pouring your kombucha down the drain, take a deep breath and relax. We’ve all been there, squinting at our jars and turning to Reddit for answers. That’s why we’ve put together this handy guide to help you identify what’s going on in your brew. Let’s break down the basics of yeast, mold, fruit flies, and other strange but normal things you might encounter in your kombucha adventure.
Yeast: The Good, the Bad, and the Cloudy
Yeast is a crucial part of the kombucha brewing process. It’s one of the key ingredients that converts sugar into alcohol and carbon dioxide, giving your kombucha that fizzy punch. Yeast tends to manifest in your brew as brown stringy bits, clumps, or sediment at the bottom of the jar. It’s totally normal to see these and, in fact, a sign that your kombucha is fermenting properly.
However, if you notice a thick, cloudy, or milky film forming, that’s just the yeast getting a bit overexcited. This is usually harmless, but it might indicate that your brew needs a bit more balance—maybe it’s time to give your SCOBY a new home or adjust your tea-to-sugar ratio.
Mold: The Unwanted Houseguest
Mold, on the other hand, is the enemy. If you spot anything fuzzy, dry, and with clear, defined edges, especially if it’s white, green, black, or blue, that’s mold. Mold grows on the surface and is never submerged, so if you see anything growing on top of your SCOBY or on the surface of your brew, it’s time to throw it out. Unfortunately, mold isn’t something you can salvage, and it’s better to start fresh than risk contamination.
How to Avoid Mold Contamination
Mold can be a real buzzkill in the kombucha brewing process, but with the right precautions, you can greatly reduce the risk of it ever appearing. Here’s how:
- Start with a Healthy SCOBY: A strong, healthy SCOBY is your first line of defense against mold. If your SCOBY looks weak, thin, or shows signs of damage, it might be more susceptible to contamination. Make sure you’re using a vibrant, thick SCOBY to kick off your brew.
- Maintain Proper pH Levels: Kombucha should have a pH level below 4.5 at all times. This acidic environment is inhospitable to mold. Test your brew’s pH regularly, especially in the first few days, and consider adding a bit of starter tea or distilled vinegar to lower the pH if needed.
- Use Clean Equipment: Ensure that everything that touches your kombucha—jars, utensils, cloth covers—is thoroughly cleaned and sanitized. Even a small amount of residue or bacteria from previous batches can invite mold.
- Control the Brewing Environment: Mold thrives in warm, damp environments, so make sure your brewing area is clean, dry, and well-ventilated. Avoid placing your brew in direct sunlight, as this can cause temperature fluctuations that stress your SCOBY.
- Cover Securely, But Let It Breathe: Your kombucha needs air to ferment, but you don’t want to leave it wide open to contaminants. Use a breathable cloth cover that’s tightly secured with a rubber band to keep out dust, pests, and mold spores while still allowing airflow.
- Check Your Brew Regularly: The earlier you spot potential problems, the easier they are to address. Check your kombucha daily, especially in the first week, to make sure everything looks and smells normal.
Fruit Flies: The Pesky Party Crashers
If there’s one creature more obsessed with kombucha than you are, it’s the fruit fly. These tiny invaders are irresistibly drawn to the sweet, tangy aroma of fermenting tea, and if they manage to sneak into your jar, they can lay eggs in the SCOBY. Gross? Absolutely. But let’s talk about what to look for and how to prevent these uninvited guests from taking over your brew.
What to Look For:
Fruit fly eggs are tiny, white, and usually found on the surface of the SCOBY or floating in the liquid. If left unchecked, these eggs can hatch into larvae—small, wiggling creatures that are definitely not supposed to be part of your kombucha experience. If you spot these, it’s unfortunately a sign that your brew has been compromised.
What to Do:
If you find fruit fly eggs or larvae in your kombucha, it’s best to discard the entire batch, including the SCOBY. While it’s possible to salvage a SCOBY by thoroughly rinsing it, the risk of contamination is high, and it’s better to start fresh. To avoid this happening in the future, make sure your brew jar is covered tightly with a breathable cloth and secured with a rubber band. Fruit flies are crafty, but they can’t get through a well-secured cover.
Prevention Tips:
- Use a Tight Weave Cloth: A thick cloth with a tight weave will keep fruit flies out while still allowing your kombucha to breathe.
- Keep the Area Clean: Fruit flies are attracted to any kind of organic matter, so keep your kitchen or brewing area clean and free of spilled tea, fruit scraps, or other food sources.
- Brew in a Clean Space: Make sure your brewing space is clean and free of any other fermenting or rotting foods that might attract flies.
Other Oddities: Don’t Fear the Floats
Sometimes, you’ll see other weird things floating around in your brew that aren’t mold or yeast. For example, if you spot jellyfish-like blobs or tiny bubbles that seem to be part of a gelatinous layer, those are likely baby SCOBYs forming, which is a sign your kombucha is happy and healthy. Another common sight is sediment at the bottom of the jar, which is usually a mix of yeast and other fermentation byproducts—nothing to worry about there either!
Let’s look at some Examples!
Being someone who frequents reddit, specifically the kombucha sub, i tend to see lots of things. I’ve compiled a few examples of the typical posts were someone takes a pictures, and then posts it for the world to see, but also ask questions. I think this serves as a great example of the various of changes that your Scoby friends can undergo. All pictures below go to my friends on the Kombucha Subreddit.
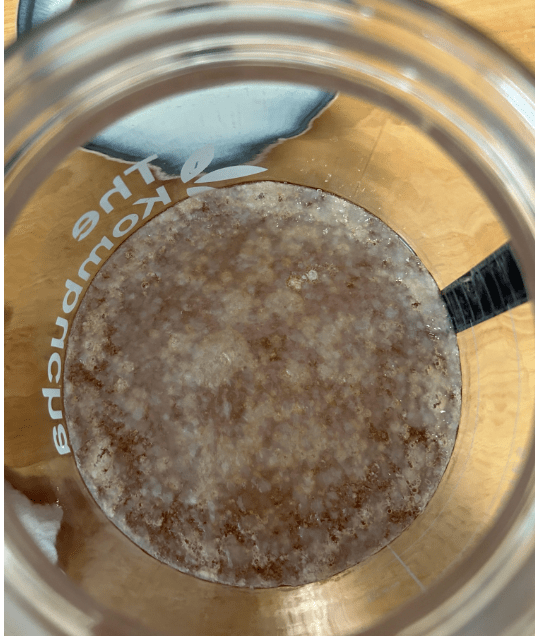
IS THAT MOLD??????
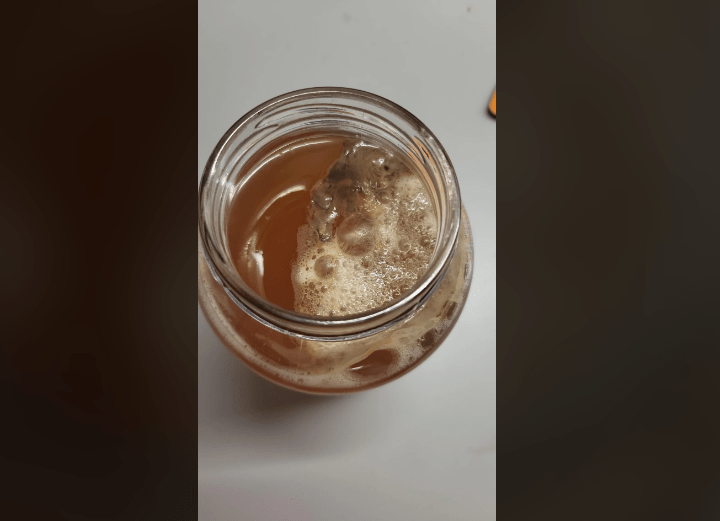
Based on the image, the consensous was it looks like the Scoby has some bubbles and possibly some yeast activity on the surface, but nothing immediately alarming. The darker patches and bubbles are likely clumps of yeast, which is a normal part of the fermentation process. Yeast can sometimes form in clusters or patches on the surface, especially if it’s been active during the fermentation.
Here’s how you can tell it’s not mold:
- No Fuzziness: Mold tends to be fuzzy or dry, while what you have here looks more smooth and bubbly.
- No Defined Edges: Mold usually has clear, defined edges and grows in a circular pattern, often with a different color in the center (white, green, blue, or black). Your brew doesn’t show those characteristics.
- Bubbles and Yeast Clumps: The presence of bubbles often indicates healthy yeast activity, which is a good sign that your brew is fermenting properly.
Conclusion: This doesn’t appear to be mold. It’s likely just some yeast activity and maybe some new SCOBY formation starting to happen. However, keep an eye on it—if it starts to develop any fuzzy, dry patches or changes color, you might want to reassess. For now, everything looks normal!
How about this, is this mold??????
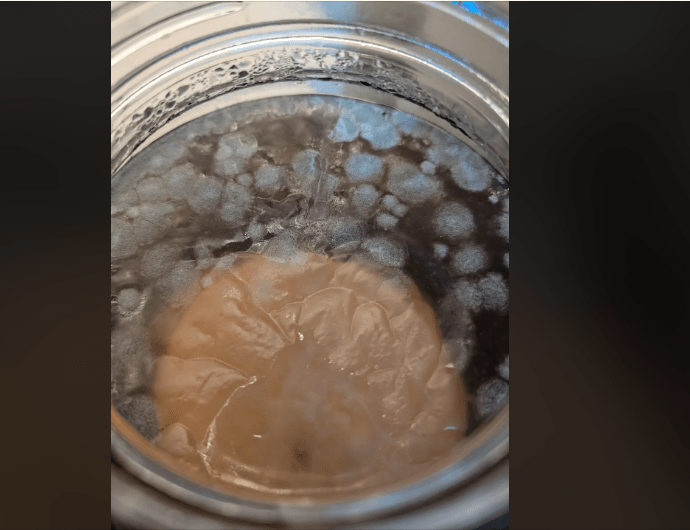
Unfortunately, what you have here looks like mold. The spots in the image show the classic signs of mold contamination:
- Fuzzy Texture: The spots appear to have a fuzzy or powdery texture, which is a key indicator of mold.
- Defined Edges: The spots have well-defined edges and appear to be growing in clusters, which is typical for mold.
- Coloration: The bluish-green color is also characteristic of mold growth, especially when it appears on the surface of kombucha.
What to Do:
- Discard the Batch: It’s best to discard the entire batch, including the SCOBY, as mold can produce harmful toxins that you don’t want in your kombucha.
- Thoroughly Clean Your Equipment: Wash your jar and any utensils with hot, soapy water, and consider sanitizing them with vinegar or boiling water to ensure all mold spores are eliminated.
- Start Fresh: Use a new SCOBY and fresh starter tea for your next batch, and make sure your brewing environment is clean and free of contaminants.
Mold can happen, but with the right precautions, you can reduce the risk in future batches.
Conclusion: Yes, it’s mold.
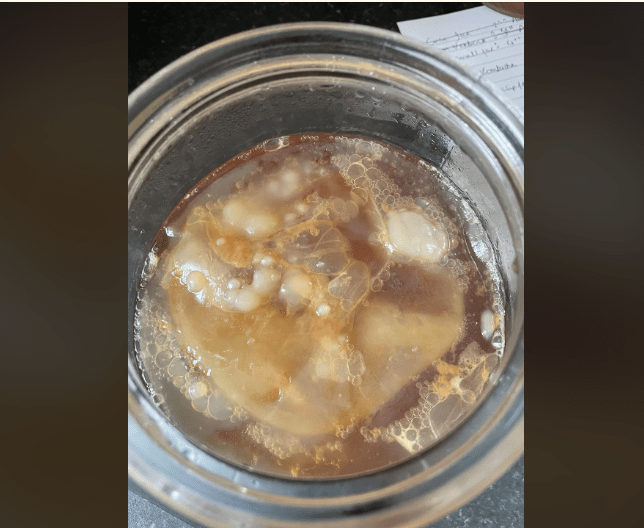
This one’s got to be mold???
Good news—this one doesn’t look like mold! What you’re seeing in this image appears to be a normal part of the kombucha brewing process, likely yeast strands or a developing SCOBY.
Here’s why:
- Brown Stringy Bits: The brown, stringy stuff hanging down from the SCOBY is a common sight in kombucha brewing. This is usually yeast, which plays a key role in the fermentation process by breaking down sugars and producing carbon dioxide (fizz) and alcohol.
- No Fuzziness: Unlike mold, these strands don’t have a fuzzy or powdery appearance. They’re smooth and filamentous, which is typical of yeast growth.
- No Defined Edges or Circles: Mold typically grows in patches with defined edges and can be circular. What you have here looks more organic and irregular, which is consistent with yeast or other normal kombucha byproducts.
Conclusion:
This is not mold—just yeast doing its job! Your kombucha looks healthy and on track. If you ever see something fuzzy, dry, and circular with defined edges, that’s when you need to worry about mold. But for now, you’re in the clear! Keep an eye on it, and happy brewing!
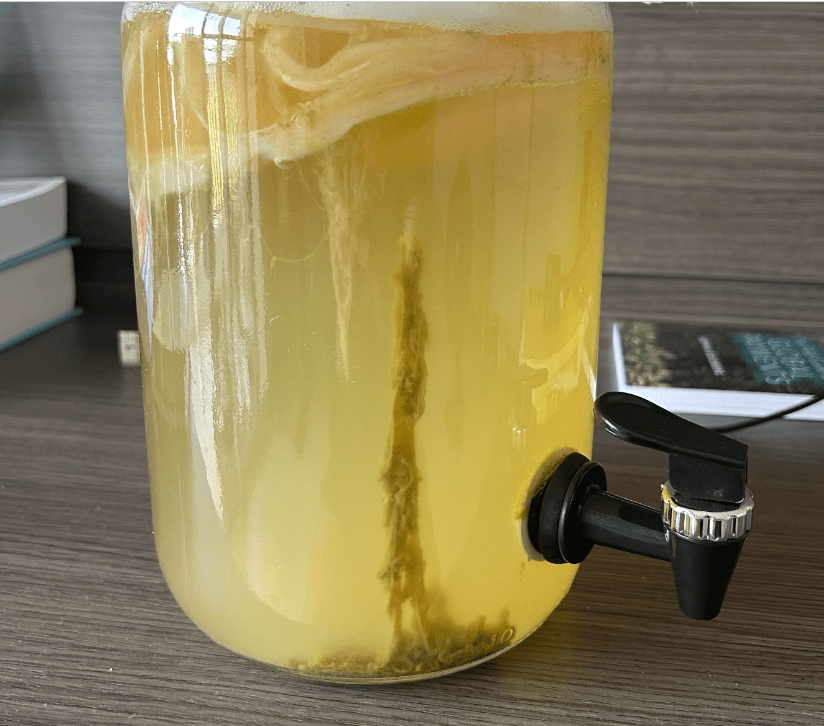
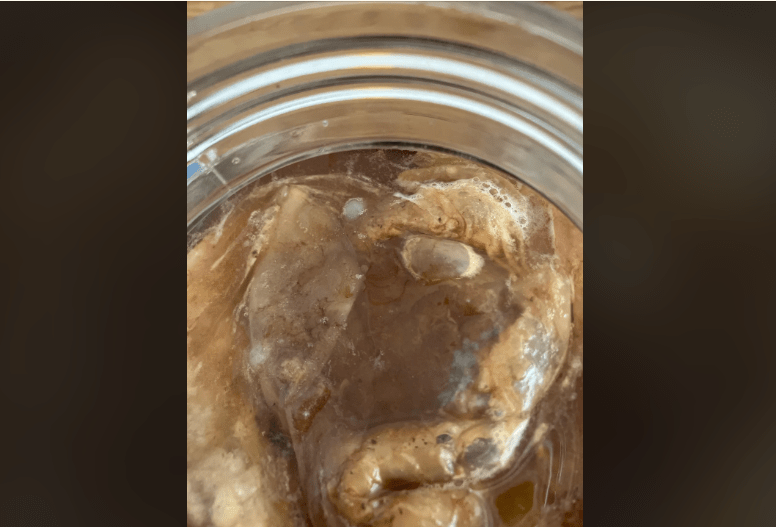
This one’s got to be mold???
Good news—this one doesn’t look like mold! What you’re seeing in this image appears to be a normal part of the kombucha brewing process, likely yeast strands or a developing SCOBY. This is your SCOBY forming.
Here’s why:
- Brown Stringy Bits: The brown, stringy stuff hanging down from the SCOBY is a common sight in kombucha brewing. This is usually yeast, which plays a key role in the fermentation process by breaking down sugars and producing carbon dioxide (fizz) and alcohol.
- No Fuzziness: Unlike mold, these strands don’t have a fuzzy or powdery appearance. They’re smooth and filamentous, which is typical of yeast growth.
- No Defined Edges or Circles: Mold typically grows in patches with defined edges and can be circular. What you have here looks more organic and irregular, which is consistent with yeast or other normal kombucha byproducts.
Conclusion:
This is not mold—just yeast doing its job! Your kombucha looks healthy and on track. If you ever see something fuzzy, dry, and circular with defined edges, that’s when you need to worry about mold. But for now, you’re in the clear! Keep an eye on it, and happy brewing!
IS that white spot mold?
This image shows something that’s still likely normal and part of the kombucha brewing process, though it might look a bit strange at first glance. Here’s what’s happening:
- White Blobs: The white, lumpy blobs you see are probably clumps of yeast or newly forming SCOBY pieces. These blobs can appear during fermentation and are a sign that the yeast and bacteria in your brew are doing their job.
- Surface Texture: The surface looks smooth and shiny, not fuzzy or powdery. Mold typically has a fuzzy texture, which isn’t present here.
- Irregular Shapes: The blobs and growths don’t have the defined, circular edges that are typical of mold. Instead, they look more like irregular, natural formations.
Conclusion:
What you’re seeing is likely a mix of yeast clumps and a developing SCOBY. It might look a bit off-putting, but it’s not mold and is a normal part of the kombucha brewing process. Your brew appears to be healthy and on track, so there’s no need to worry! Keep brewing, and you’ll have delicious kombucha in no time!
Is this mold?
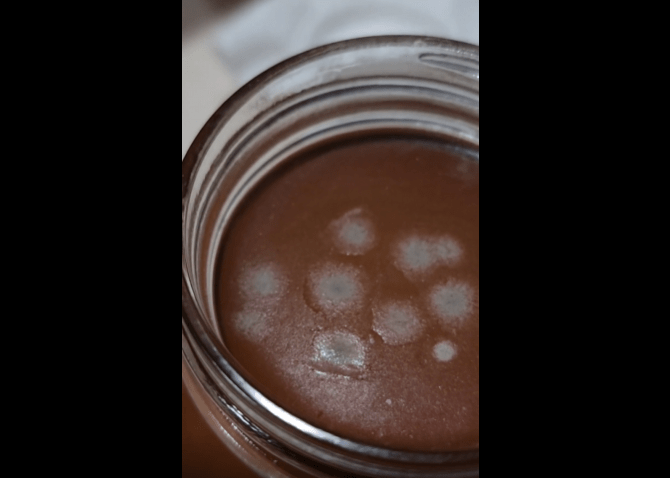
TUnfortunately, this one looks like mold. Here’s why:
- Fuzzy Texture: The spots appear to have a fuzzy, almost cotton-like texture, which is a clear sign of mold.
- Defined Circular Edges: The spots are circular with well-defined edges, a typical characteristic of mold growth in kombucha.
- Coloration: The spots have a whitish center with what appears to be greenish or bluish hues, which are common mold colors, especially when it first starts to develop.
What to Do:
- Discard the Batch: It’s important to discard the entire batch, including the SCOBY, as mold can produce harmful toxins that you don’t want to risk consuming.
- Thoroughly Clean Your Equipment: Make sure to thoroughly clean and sanitize your jar and any other equipment that came into contact with the brew. Use hot, soapy water, and consider a vinegar rinse or even boiling water to kill any lingering mold spores.
- Start Fresh: Get a new SCOBY and fresh starter tea before beginning a new batch, and ensure your brewing environment is clean and mold-free.
Mold can be frustrating, but by maintaining a clean environment and following best practices, you can reduce the risk in future brews.
EWWW, is that mold?

Unfortunately, this image shows clear signs of mold. Here’s why:
- Fuzzy Texture: The patches in your kombucha have a fuzzy, almost velvety appearance, which is a classic indicator of mold.
- Circular, Well-Defined Edges: The mold spots are circular with well-defined edges, which is typical for mold growth.
- Coloration: The mold appears to be light-colored, possibly gray or greenish, which are common mold colors in kombucha.
What to Do:
- Discard the Batch: It’s best to discard this batch entirely, including the SCOBY. Mold can produce harmful toxins that could contaminate the entire brew, making it unsafe to drink.
- Clean and Sanitize: Thoroughly clean and sanitize your jar and any utensils used. Use hot, soapy water, and consider sanitizing with vinegar or boiling water to ensure no mold spores remain.
- Start Fresh: You’ll need to start with a new SCOBY and fresh starter tea. Ensure that your brewing environment is clean, and take extra precautions to prevent mold in the future.
THROW THAT BEAST OUT, start over.
Not sure about this one, is it mold?
This was actually an interesting one, i ran through all these pictures through openAI first to verify and this one Open AI said it was NOT mold, but the readers on reddit said it was mold due to the blue/grayish spot near the top.
The small circular spot at the top of the picture that appears greenish or grayish could potentially be the early stages of mold. Here’s why:
- Circular Shape: Mold often begins as small, circular spots with well-defined edges, just like the one you’re pointing out.
- Coloration: The green or grayish hue is typical of mold, especially in its early stages. Mold in kombucha can start off subtle before it becomes more noticeable.
I think this is a great example of if your unsure, just throw it out. In the above situation if it is in fact mold, simply leaving it and observing over the next few days would give you you’re answer. Being cautious is good.
Look Very Closely, white worms

Yikes! If you’re spotting tiny, worm-like creatures on your SCOBY, it does indeed sound like you’ve got fruit fly larvae hitchhiking in your brew. Fruit flies are notorious for sneaking into kombucha brews if the jar isn’t tightly sealed, and they can lay eggs on the surface of the SCOBY.
Here’s what to do:
- Discard the Batch: Unfortunately, you’ll need to toss this batch of kombucha, including the SCOBY. The larvae can introduce harmful bacteria, making it unsafe to drink.
- Deep Clean Everything: Clean and sanitize your brewing jar, utensils, and any other equipment thoroughly. Use hot water and distilled vinegar to make sure no remnants or eggs are left behind.
- Start Fresh: When starting your next batch, ensure the jar is well-covered with a breathable but tightly secured cloth to keep those pesky flies out.
It’s frustrating, but catching it early is key to keeping your future brews safe and tasty!
Wrapping It Up:
Navigating the world of kombucha brewing can feel like a mix of science and art, with a dash of “what on earth is that?” thrown in for good measure. As you’ve seen, not every strange thing that shows up in your jar is cause for concern—yeast, new SCOBYs, and even some funky floaties are all part of the natural process. But when mold rears its fuzzy head, it’s time to act swiftly and safely.
By learning to identify the common sights in your kombucha, you’re not just ensuring a healthy brew, but also becoming a more confident and knowledgeable fermenter. Remember, every batch is a learning experience, and even when things go wrong, it’s just another step on your journey to mastering the art of kombucha.
So, keep your brewing environment clean, monitor your SCOBY, and don’t be afraid to start fresh if you encounter something suspicious. With these tips and a little patience, you’ll be well on your way to brewing delicious, mold-free kombucha every time.
Happy brewing—and may your SCOBYs be strong, your yeast be active, and your jars be mold-free!