Kombucha Fermentation Tops: Securing Your Brew and Keeping Pesky Pests Out
Securing Your Brew and Keeping Pesky Pests Out Picture this: You’re excitedly brewing a fresh batch of kombucha. You’ve carefully selected your…
Securing Your Brew and Keeping Pesky Pests Out
Picture this: You’re excitedly brewing a fresh batch of kombucha. You’ve carefully selected your tea, your SCOBY is looking healthy, and you’ve got just the right amount of sugar to kickstart that magical fermentation process. A few days into your first fermentation (F1), you check on your brew, only to find that those sneaky fruit flies have somehow infiltrated your jar, turning your precious kombucha into a pest-infested disaster. Ugh!

This happened to me recently, and let me tell you, there’s nothing more disappointing than having to toss out an entire batch of kombucha because of some unwelcome guests. It made me realize that while we often obsess over ingredients and brew time, the type of cover we use for our fermentation jars is just as crucial. So, let’s dive into the world of kombucha fermentation tops—what works, what doesn’t, and how you can safeguard your brew against even the tiniest intruders.
The Basics: Why Your Kombucha Jar Needs to Breathe
Before we get into the different types of fermentation tops, let’s talk about why you can’t just screw on the lid and call it a day. Kombucha is a living, breathing beverage. During the fermentation process, your SCOBY (Symbiotic Culture of Bacteria and Yeast) produces carbon dioxide and needs to release excess pressure. At the same time, it requires oxygen to facilitate the fermentation process. This is why it’s essential to cover your jar with something that allows airflow while keeping contaminants out.

Common Kombucha Fermentation Tops
1. Paper Towels: The DIY Classic
Pros: Paper towels are cheap, widely available, and super easy to use. Grab one from your kitchen, place it over your jar, and secure it with a rubber band.
Cons: While paper towels are breathable, they’re also quite porous, meaning tiny insects like fruit flies can sometimes wiggle their way through. Additionally, paper towels can tear easily, especially if they get wet from condensation inside the jar.
My Take: Paper towels are fine in a pinch, but if you’re serious about protecting your brew, you might want to consider something more secure.
2. Kitchen Towels: The Sturdy Alternative
Pros: Kitchen towels are thicker and more durable than paper towels. They provide better protection against pests and can be easily washed and reused.
Cons: The thicker material can sometimes restrict airflow a bit too much, slowing down the fermentation process. Plus, if the towel isn’t secured tightly, crafty flies may still find a way in.
My Take: Kitchen towels are a step up from paper towels, especially if you’re using a tight weave. However, be cautious about how much airflow they allow. You don’t want to choke your SCOBY.
3. Fermentation Cloth Tops: Designed for the Job
Pros: Fermentation cloths are specifically made for the job. They’re breathable yet tightly woven to keep out even the smallest pests. Many come with an elastic band sewn in for a snug fit around your jar.
Cons: These can be a bit pricier than your DIY options, and depending on the material, they may need to be washed frequently to avoid any buildup of bacteria.
My Take: After my fruit fly fiasco, I invested in a high-quality fermentation cloth with an elastic band, and it has made a world of difference. Not only does it keep my brew safe, but it also allows for proper airflow. Worth every penny!
4. Cheesecloth: The Middle Ground
Pros: Cheesecloth is another popular option for covering kombucha jars. It’s lightweight, breathable, and relatively cheap. It also allows for great airflow, which can help speed up the fermentation process.
Cons: The weave of cheesecloth can sometimes be too loose, making it easy for fruit flies and other small insects to sneak in. You may need to double or triple layer it for extra protection.
My Take: If you’re using cheesecloth, make sure to double up and secure it tightly with a rubber band. It’s a decent option but not my first choice for long-term use.
Understanding the Fruit Fly Attraction: Why They Love Your Kombucha
Fruit flies are the uninvited guests at every kombucha brewing party. But what exactly draws these tiny pests to your brew?
Why Are Fruit Flies Attracted to Kombucha?
Fruit flies are naturally attracted to sugary and acidic environments, which makes kombucha a perfect target. The fermentation process in F1 (the first fermentation stage) produces a sweet, slightly tangy aroma that fruit flies find irresistible. They’re especially drawn to the gases released by the fermenting sugars and the yeasty scent emanating from your SCOBY.
What Happens When Fruit Flies Get Into Your Kombucha?
If fruit flies manage to infiltrate your kombucha during the F1 stage, it can lead to several problems:
- Egg Laying: Female fruit flies are prolific breeders. If they find their way into your kombucha jar, they’ll lay eggs on the surface of the brew or on the SCOBY. Each female can lay up to 500 eggs at a time, so it doesn’t take long for an infestation to occur.
- Larvae Development: Once the eggs hatch, the larvae (tiny white worms) begin feeding on the yeast and sugars in your kombucha. They’re typically visible as tiny, white, wriggling specks on the surface of your brew or within the SCOBY itself.
- Contamination Risk: The presence of fruit fly eggs and larvae can introduce harmful bacteria or mold into your kombucha. While the acidic environment of kombucha can deter some pathogens, it’s not foolproof. An infestation can compromise the safety and taste of your brew, making it unfit for consumption.
Identifying Fruit Fly Eggs and Larvae in Kombucha
Early detection is key to saving your batch before it’s too late. Here’s what to look for:
- Eggs: Fruit fly eggs are tiny, white, and oval-shaped. They can be challenging to see with the naked eye, especially if they’re embedded in the SCOBY or floating on the surface of the liquid.
- Larvae: The larvae, also known as maggots, are small white worms. They’re often found on the surface of the kombucha or burrowing into the SCOBY. If you notice any movement on your SCOBY or strange specks in your brew, inspect closely for larvae.

What to Do If You Find Fruit Flies or Larvae in Your Kombucha
If you discover fruit flies, eggs, or larvae in your kombucha during the F1 stage, it’s best to discard the entire batch. It’s disappointing, but the risk of contamination is too high to justify salvaging the brew. Thoroughly clean and sanitize your fermentation jar and equipment before starting a new batch to prevent future infestations.
The Science Behind Kombucha Fermentation and Airflow
Let’s get a bit nerdy for a moment. Kombucha fermentation relies on a balance between oxygen and the yeast and bacteria in your SCOBY. Oxygen is critical in the early stages of fermentation, where it helps the bacteria produce acetic acid and other beneficial compounds. This process creates the tangy flavor kombucha enthusiasts love.
However, too much exposure to air can lead to over-acidification or even spoilage, while too little can slow down fermentation, making it less effective. This is why your choice of cover is so important—it’s about finding that sweet spot where your brew gets enough oxygen to thrive, but not so much that it becomes vulnerable to contaminants.

My Fruit Fly Fiasco and the Double-Security Fix
As I mentioned earlier, my recent kombucha brewing experience was soured (pun intended) by an invasion of fruit flies. I had used a single layer of cheesecloth to cover my jar, thinking it would be enough. Unfortunately, the flies found a way in, and I ended up with a batch of kombucha that had to be tossed out.
Determined to prevent this from happening again, I decided to take my fermentation security to the next level. Here’s what I did:
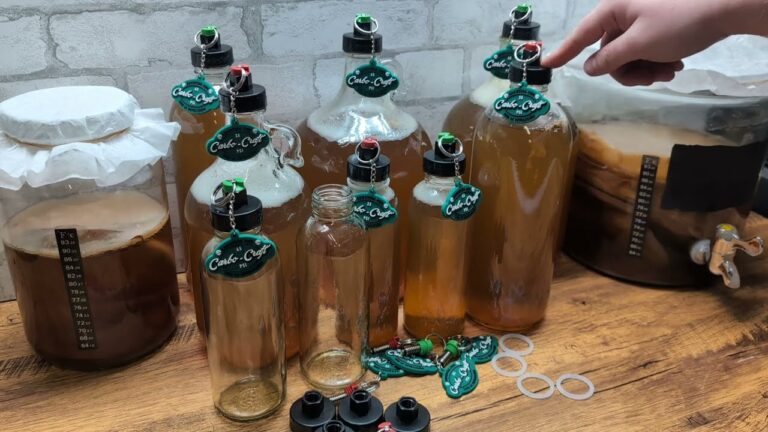
- Invested in a High-Quality Fermentation Cloth: I purchased a glass jar cloth cover specifically designed for kombucha and sourdough. It came with a built-in elastic band that fits snugly around the jar, ensuring no gaps or entry points for pests.
- Added an Extra Layer of Protection: In addition to the fermentation cloth, I also learned how to tie a secure knot around the jar top using a piece of string or kitchen twine. This double layer of security gave me peace of mind, knowing that my kombucha was safe from unwanted visitors.
How to Tie a Clove Hitch Knot Around a Mason Jar
To properly secure your kombucha jar, I used a Clove Hitch knot, which is perfect for creating a tight, secure grip around the jar’s neck. Here’s how to do it:
- Start with the String or Twine: Take a piece of string or kitchen twine long enough to wrap around the jar’s neck with extra length for tying the knot.
- Wrap the String Around the Jar: Hold the middle of the string against the jar’s neck, just below the rim. Wrap one end of the string around the neck, crossing it over the other end.
- Form the First Half-Hitch: Bring the working end under the crossed section to create a loop, then pull the string tight.
- Form the Second Half-Hitch: Wrap the same working end around the neck again, tucking it under the string near the first loop in the opposite direction, then tighten.
- Secure the Knot: Adjust the tension by pulling both ends of the string until the clove hitch is snug. If desired, tie the ends together with a simple overhand knot or bow to ensure the clove hitch doesn’t loosen over time.
The Clove Hitch knot ensures that the fermentation cloth stays securely in place, preventing even the most determined fruit flies from finding their way in.

- Checked and Adjusted Regularly: Even with these precautions, I made it a habit to check the cover regularly, ensuring it remained tight and secure. Fermentation creates pressure, and sometimes the cover can shift slightly. A quick adjustment every few days helps keep everything in place.
How to Properly Secure Your Fermentation Cover
If you want to avoid the same fate as my ill-fated batch, here’s a quick guide on how to properly secure your kombucha jar:
- Choose the Right Material: Opt for a fermentation cloth, kitchen towel, or double-layered cheesecloth. Make sure the material is breathable but tightly woven to prevent pests from getting through.
- Use Elastic or Rubber Bands: Secure the cover with a strong elastic band or rubber band. This will hold the material in place and create a tight seal around the jar.
- Add Extra Security: For added protection, tie a piece of string or twine around the top of the jar over the cover. This ensures that even if the elastic band slips, the cover stays securely in place.
- Check Regularly: Every few days, check your cover to make sure it’s still tight and secure. Adjust as needed to maintain a good seal.
Identifying Contamination in Your Kombucha
Despite your best efforts, contamination can still occur. It’s essential to know the signs so you can catch any issues early. Common indicators include:
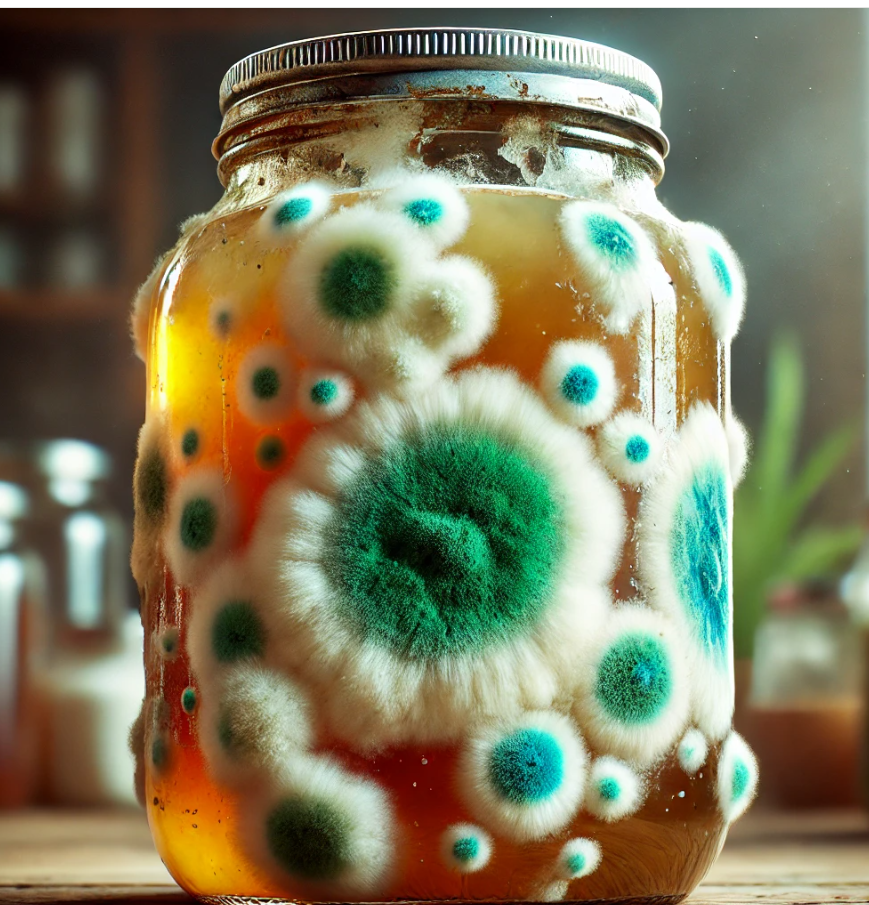
- Mold: If you see fuzzy spots in colors like white, blue, green, or black, it’s mold. Unfortunately, mold means you need to discard the entire batch.
- Off Smells: Kombucha should have a slightly tangy, vinegar-like smell. If it smells rancid, rotten, or just plain wrong, it’s a sign that something’s off.
- Unusual Colors or Textures: If your SCOBY changes to an unusual color or develops an odd texture, it could indicate contamination.
When in doubt, it’s safer to discard the batch and start fresh. A little caution can save you from potential health risks.
DIY Fermentation Covers: How to Make Your Own
For those who love a good DIY project, making your own fermentation covers can be a fun and cost-effective solution. Here’s how:
- Select Your Fabric: Choose a tightly woven fabric like muslin or cotton. Avoid fabrics that are too thick or too thin.
- Cut to Size: Measure the diameter of your jar and cut the fabric into squares, leaving enough extra to cover the sides and secure it with an elastic band.
- Add Elastic: If you’re handy with a needle and thread, sew an elastic band around the edges of the fabric to create a snug, custom fit. Otherwise, a sturdy rubber band will do the trick.
DIY covers can be just as effective as store-bought ones, as long as you ensure they fit tightly and are made from breathable material.
Conclusion: Protect Your Brew and Enjoy Worry-Free Fermentation
When it comes to brewing kombucha, every detail matters—including how you cover your fermentation jar. As I learned the hard way, a little extra effort in securing your brew can save you from the heartbreak of having to toss out an entire batch.
Whether you go with a simple kitchen towel, invest in a specialized fermentation cloth, or add extra security with a tied knot, the key is to find a method that works for you and keeps those pesky pests at bay. With the right setup, you can enjoy the delicious, fizzy goodness of homemade kombucha without any unwelcome surprises. Happy brewing!
By following these tips and tricks, you’ll be well on your way to brewing kombucha that’s not only delicious but also safe from pests. Cheers to your next successful batch!